> ## Documentation Index
> Fetch the complete documentation index at: https://docs.raehost.com/llms.txt
> Use this file to discover all available pages before exploring further.

# Cara Install Simple Voice Chat

<Note>
  Fitur ini hanya dapat dijalankan di Minecraft Java Edition
</Note>

Ikuti langkah berikut untuk mengaktifkan fitur voice chat di server Minecraft kamu menggunakan plugin Simple Voice Chat.

<Steps>
  <Step title="Login ke Panel">
    Untuk melakukan ini, kamu perlu login ke panel melalui [https://panel.raehost.com/](https://panel.raehost.com/) Kemudian pilih servermu.

    <Frame>
      <img src="https://mintcdn.com/raehost/DuBe5lfPUkfPDGjK/images/image-57.png?fit=max&auto=format&n=DuBe5lfPUkfPDGjK&q=85&s=eed2c050c696e585064045b093ba55d9" alt="Image" title="Image" className="mx-auto" width="1900" height="570" data-path="images/image-57.png" />
    </Frame>
  </Step>

  <Step title="Stop Server">
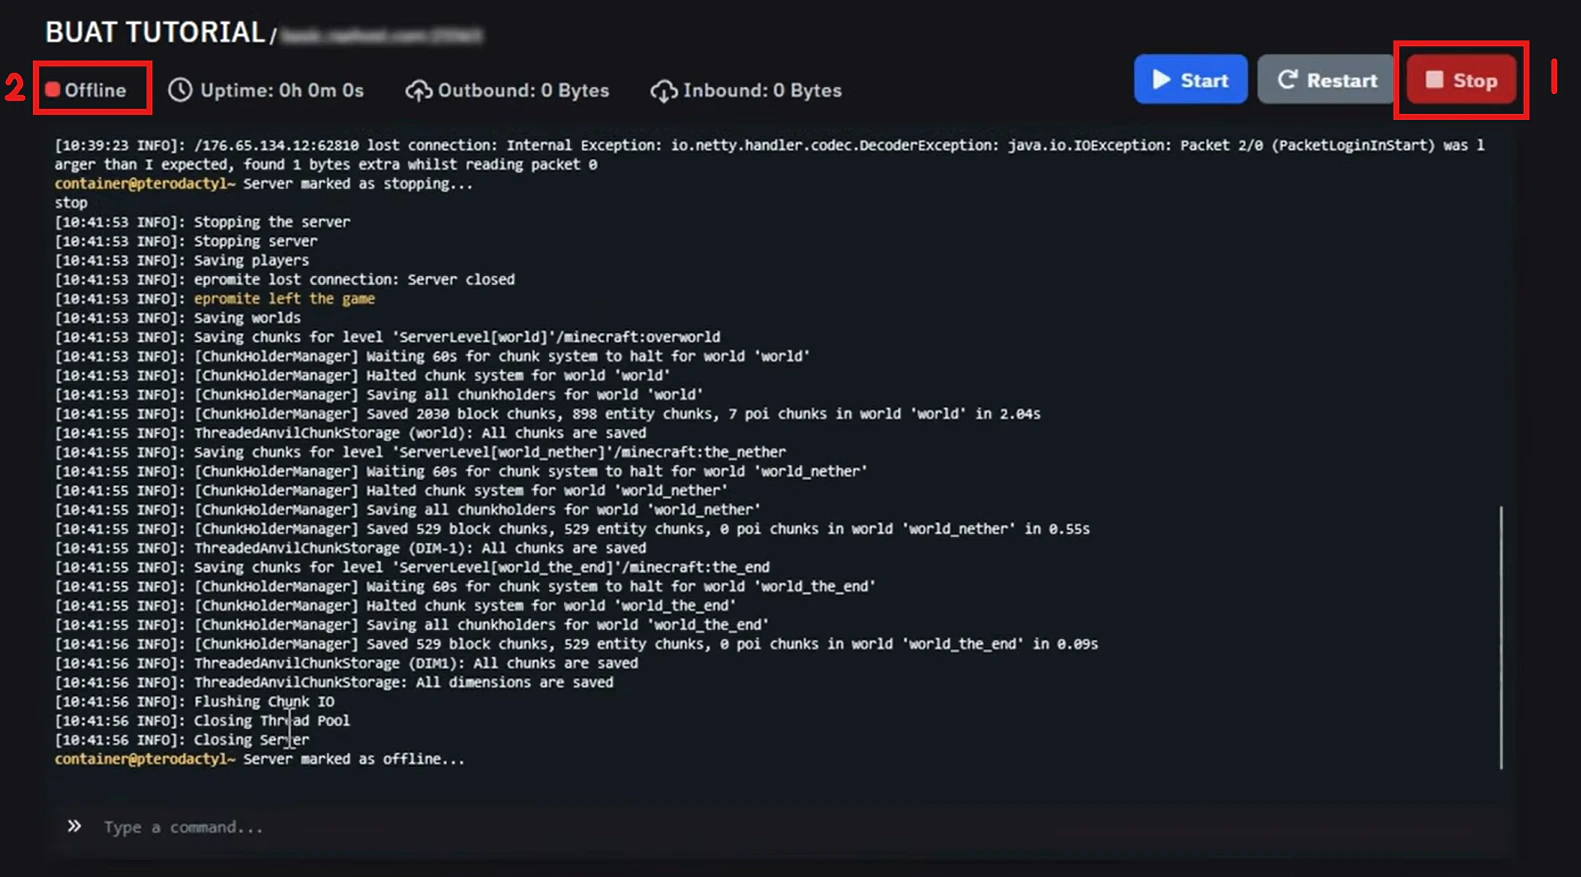
    Klik tombol `Stop` seperti yang ditampilkan oleh nomor 1. Jika sudah di stop, maka server akan `offline` seperti yang ditampilkan oleh nomor 2.

    <Frame>
      <img src="https://mintcdn.com/raehost/TN8wBDtEi5p7jbSx/images/image-86.png?fit=max&auto=format&n=TN8wBDtEi5p7jbSx&q=85&s=fe658f0c6ff9d4a72fc8072abb0e4052" alt="Image" width="1581" height="877" data-path="images/image-86.png" />
    </Frame>
  </Step>

  <Step title="Install Plugin">
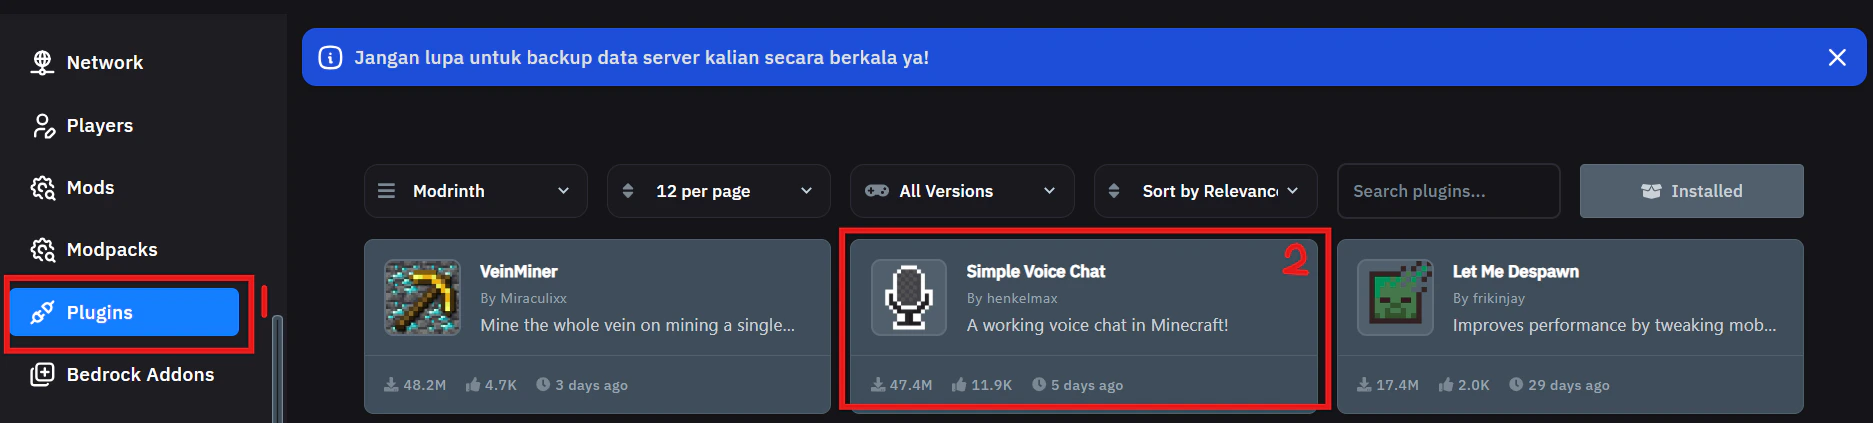
    Masuk ke tab `Plugin` seperti yang ditampilkan oleh nomor 1. Kemudian cari plugin simple voice chat seperti yang ditampilkan oleh nomor 2.

    <Frame>
      <img src="https://mintcdn.com/raehost/TN8wBDtEi5p7jbSx/images/image-87.png?fit=max&auto=format&n=TN8wBDtEi5p7jbSx&q=85&s=f74095f06bb7da5e52b624dc327f0e1a" alt="Image" width="1873" height="423" data-path="images/image-87.png" />
    </Frame>

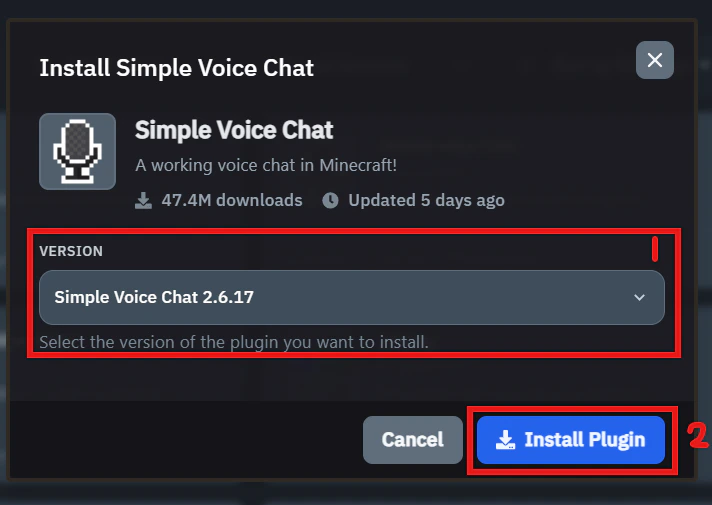
    Kemudian klik plugin tersebut. Pilih versi yang kamu butuhkan pada nomor 1. Kemudian klik `Install Plugin`  pada nomor 2.

    <Frame>
      <img src="https://mintcdn.com/raehost/TN8wBDtEi5p7jbSx/images/image-88.png?fit=max&auto=format&n=TN8wBDtEi5p7jbSx&q=85&s=62638317fe0ff4e776c0eb6e23faf64a" alt="Image" className="mx-auto" style={{ width:"87%" }} width="712" height="505" data-path="images/image-88.png" />
    </Frame>
  </Step>

  <Step title="Start Server">
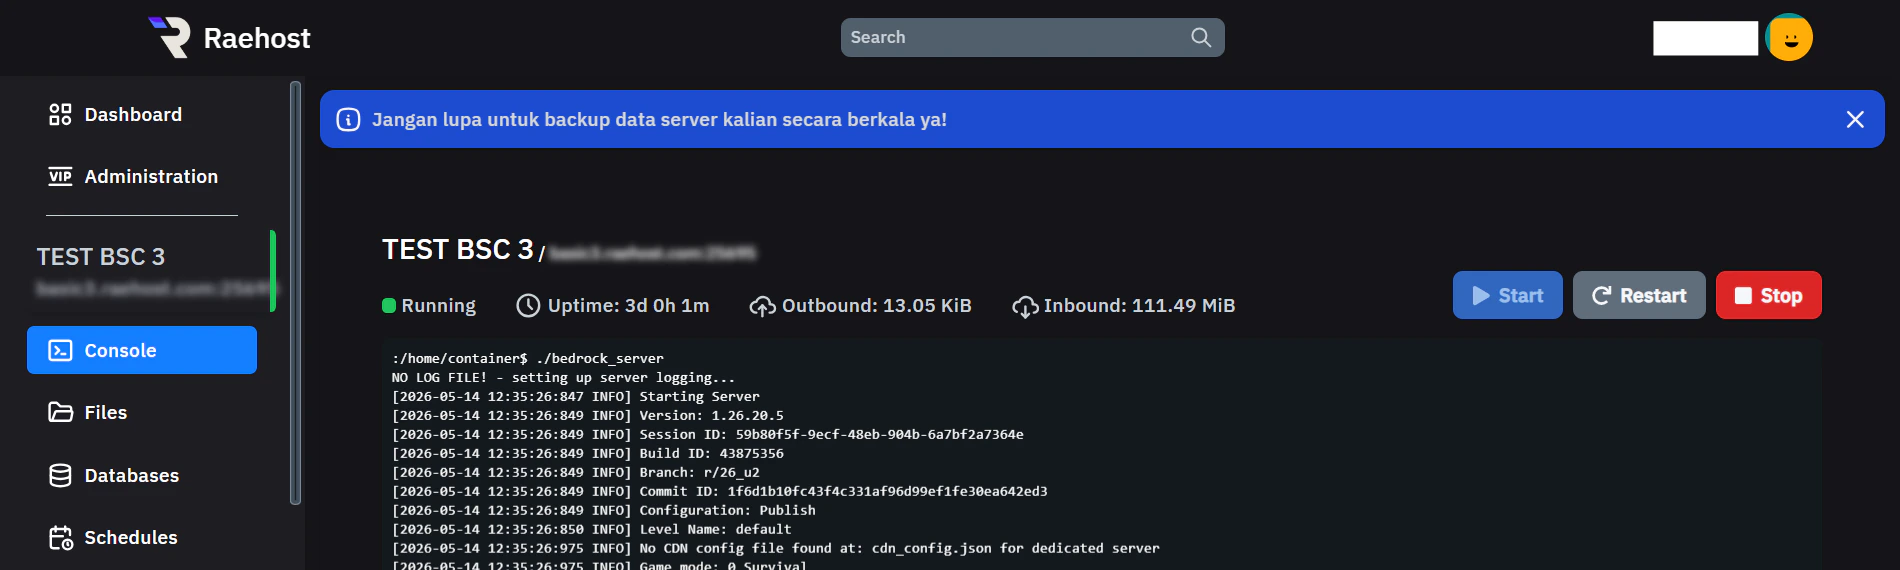
    Akses `Panel > Console`. Kemudian start server.

    <Frame>
      <img src="https://mintcdn.com/raehost/chYr6H1-Y2bDgTVz/images/image-36.png?fit=max&auto=format&n=chYr6H1-Y2bDgTVz&q=85&s=b840dd5de97d03c596d30beb2f8adf66" alt="Image" width="1528" height="151" data-path="images/image-36.png" />
    </Frame>
  </Step>

  <Step title="Cari Port Voice">
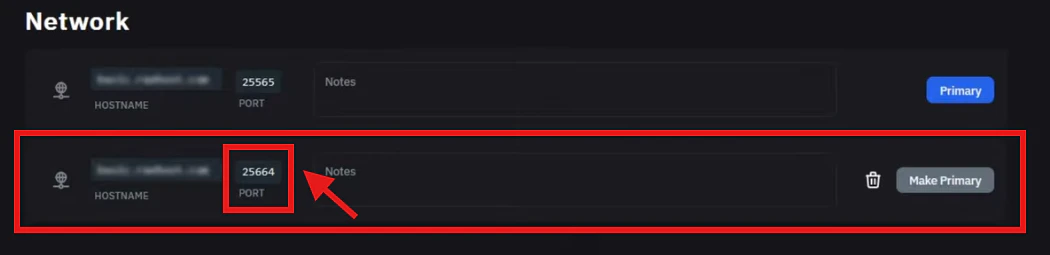
    Masuk ke tab`Network`. Pastikan kamu memiliki 2 port. Copy port yang kedua.

    <Frame>
      <img src="https://mintcdn.com/raehost/TN8wBDtEi5p7jbSx/images/image-90.png?fit=max&auto=format&n=TN8wBDtEi5p7jbSx&q=85&s=dcd0a2cd2f49a86281015f8774d02720" alt="Image" width="1050" height="255" data-path="images/image-90.png" />
    </Frame>

    <Note>
      Jika kamu hanya memiliki 1 port pada tab `Network` silahkan buat tiket untuk meminta port tambahan. 
    </Note>
  </Step>

  <Step title="Konfigurasi File ">
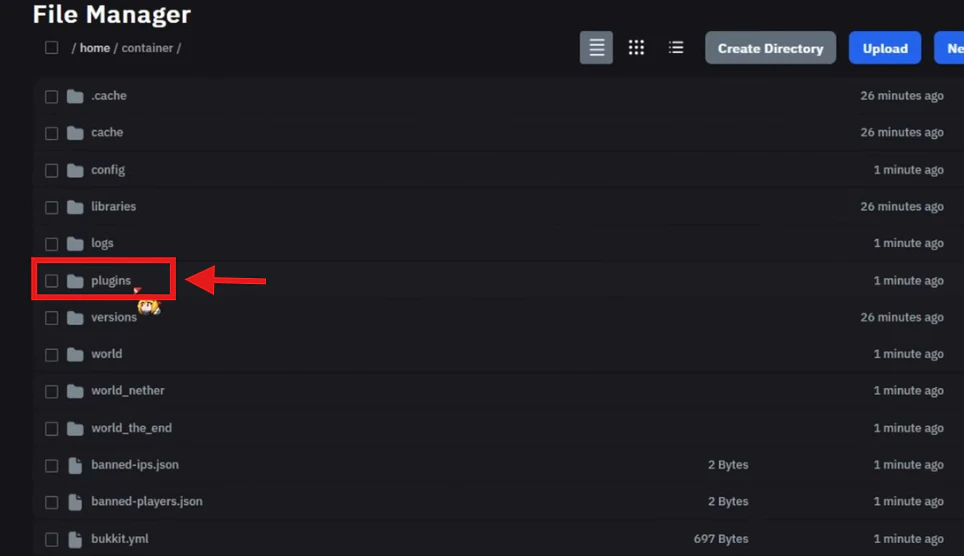
    Masuk ke tab `Files` kemudian cari file `plugins` seperti yang ditampilkan gambar berikut:

    <Frame>
      <img src="https://mintcdn.com/raehost/TN8wBDtEi5p7jbSx/images/image-92.png?fit=max&auto=format&n=TN8wBDtEi5p7jbSx&q=85&s=f45cffb45f8beaa1429d6bff53f13acc" alt="Image" width="964" height="556" data-path="images/image-92.png" />
    </Frame>

    Kemudian masuk ke file `voicechat` seperti yang ditunjukkan oleh gambar berikut:

    <Frame>
      <img src="https://mintcdn.com/raehost/TN8wBDtEi5p7jbSx/images/image-93.png?fit=max&auto=format&n=TN8wBDtEi5p7jbSx&q=85&s=d66c208eb9c2807e0010746ad2329423" alt="Image" width="1057" height="198" data-path="images/image-93.png" />
    </Frame>

    Masuk ke file `voicechat-server.properties` seperti yang ditunjukkan oleh gambar berikut:

    <Frame>
      <img src="https://mintcdn.com/raehost/TN8wBDtEi5p7jbSx/images/image-95.png?fit=max&auto=format&n=TN8wBDtEi5p7jbSx&q=85&s=a5e8f9b8b2c4aecf252c8d034281f503" alt="Image" width="1042" height="190" data-path="images/image-95.png" />
    </Frame>
  </Step>

  <Step title="Update Port">
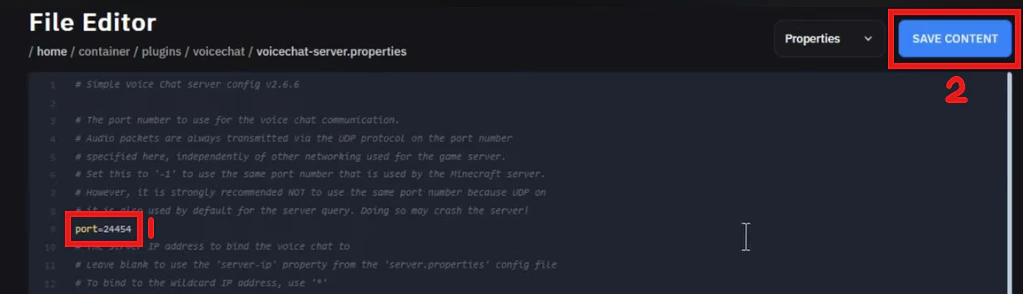
    Ubah port yang ditunjuk oleh nomor 1 dengan port yang sudah di copy sebelumnya. Kemudian klik `save content` seperti yang ditunjuk oleh nomor 2.

    <Frame>
      <img src="https://mintcdn.com/raehost/TN8wBDtEi5p7jbSx/images/image-91.png?fit=max&auto=format&n=TN8wBDtEi5p7jbSx&q=85&s=c8e3847731e6861d8ad5bf866ee67911" alt="Image" width="1023" height="294" data-path="images/image-91.png" />
    </Frame>
  </Step>

  <Step title="Restart Server">
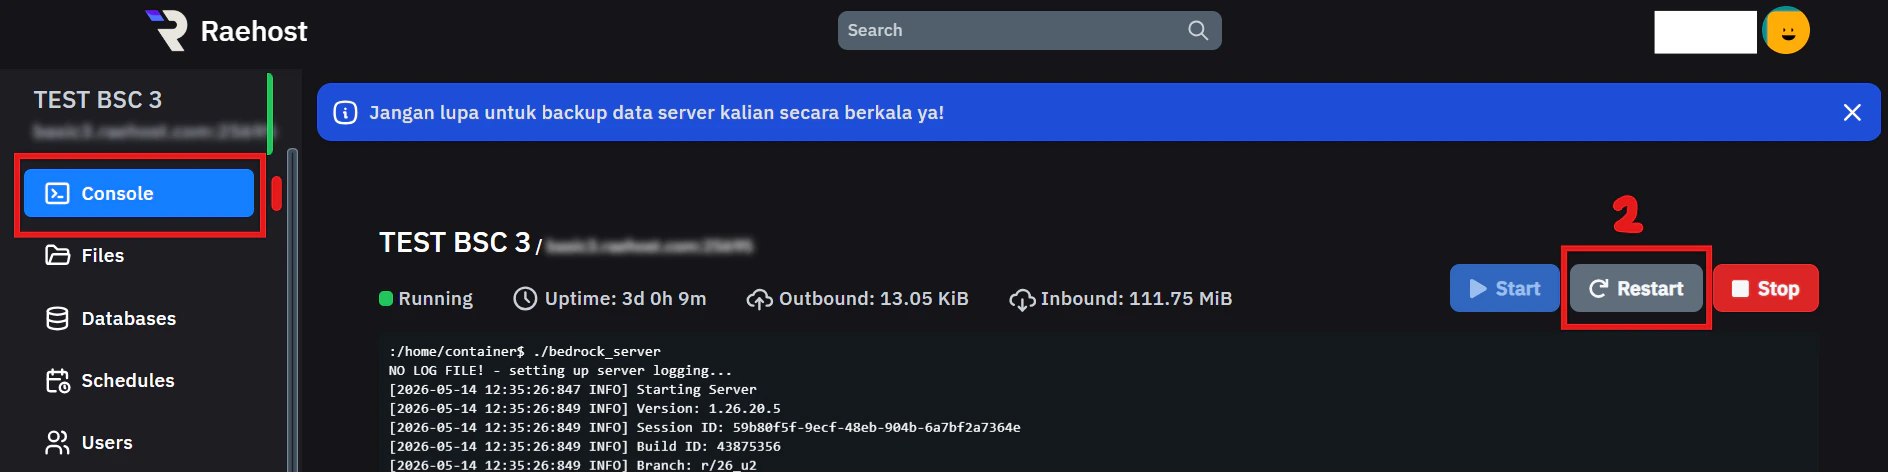
    Setelah `restore` selesai, pergi ke tab `Console` seperti yang ditunjukkan pada nomor 1. Kemudian klik `Restart` seperti yang ditunjukkan pada nomor 2.

    <Frame>
      <img src="https://mintcdn.com/raehost/DuBe5lfPUkfPDGjK/images/image-60.png?fit=max&auto=format&n=DuBe5lfPUkfPDGjK&q=85&s=5aae0be32334bd5427dbf6ae94441ac2" alt="Image" width="1888" height="472" data-path="images/image-60.png" />
    </Frame>
  </Step>

  <Step title="Cek di Minecraft">
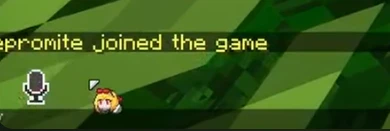
    Jika pada pojok kiri bawah minecraft kamu sudah terdapat icon voice, artinya voice sudah terinstall ke server kamu. 
    <Frame caption="Contoh icon">
      <img src="https://mintcdn.com/raehost/TN8wBDtEi5p7jbSx/images/image-94.png?fit=max&auto=format&n=TN8wBDtEi5p7jbSx&q=85&s=0cc2d2a2a163a79c88fa3accde909b07" alt="Image" width="390" height="131" data-path="images/image-94.png" />
    </Frame>
  </Step>
</Steps>

<iframe src="https://www.youtube.com/embed/LuaHJg85DY0" title="YouTube video player" frameborder="0" className="w-full aspect-video rounded-xl" allow="accelerometer; autoplay; clipboard-write; encrypted-media; gyroscope; picture-in-picture; web-share" allowfullscreen />