> ## Documentation Index
> Fetch the complete documentation index at: https://docs.raehost.com/llms.txt
> Use this file to discover all available pages before exploring further.

# Cara Upload File Besar Menggunakan SFTP

Kalau kamu mau upload file besar (di atas 100 MB) atau banyak file sekaligus, pakai **SFTP** jauh lebih cepat dan stabil daripada File Manager di panel.

<Steps>
  <Step title="Download Software SFTP">
    Contoh: 

    * FileZilla
    * WinSCP
    * Termius
  </Step>

  <Step title="Login ke Panel">
    Untuk melakukan ini, kamu perlu login ke panel melalui [https://panel.raehost.com/](https://panel.raehost.com/) Kemudian pilih servermu.

    <Frame>
      <img src="https://mintcdn.com/raehost/DuBe5lfPUkfPDGjK/images/image-57.png?fit=max&auto=format&n=DuBe5lfPUkfPDGjK&q=85&s=eed2c050c696e585064045b093ba55d9" alt="Image" title="Image" className="mx-auto" width="1900" height="570" data-path="images/image-57.png" />
    </Frame>
  </Step>

  <Step title="Stop Server">
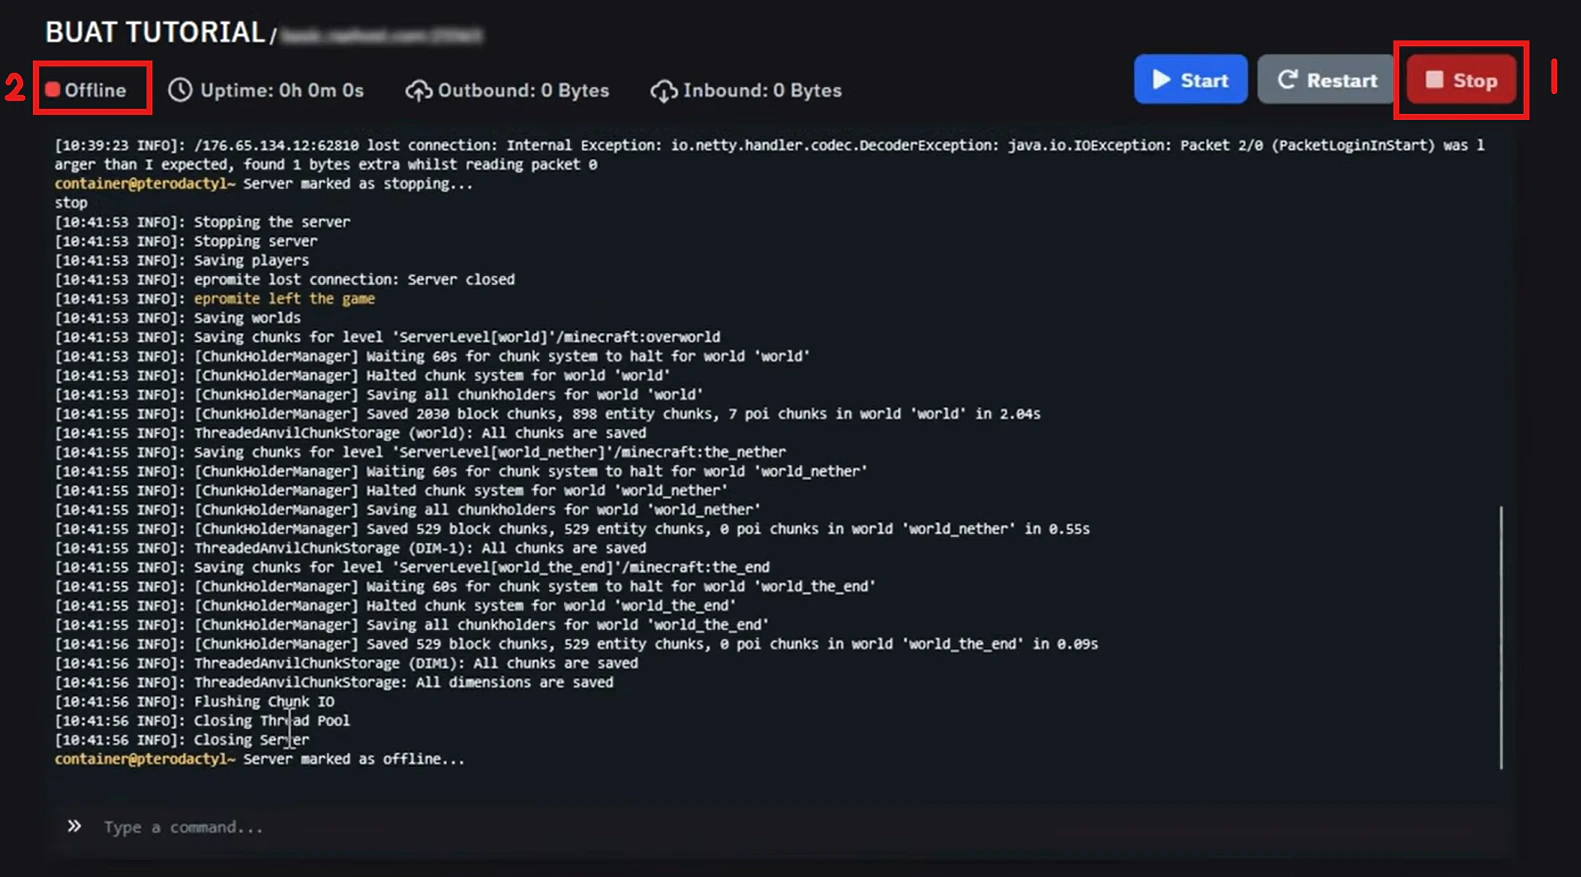
    Klik tombol `Stop` seperti yang ditampilkan oleh nomor 1. Jika sudah di stop, maka server akan `offline` seperti yang ditampilkan oleh nomor 2.

    <Frame>
      <img src="https://mintcdn.com/raehost/TN8wBDtEi5p7jbSx/images/image-86.png?fit=max&auto=format&n=TN8wBDtEi5p7jbSx&q=85&s=fe658f0c6ff9d4a72fc8072abb0e4052" alt="Image" width="1581" height="877" data-path="images/image-86.png" />
    </Frame>
  </Step>

  <Step title="Masuk ke Tab Settings dan Hubungkan SFTP dengan Panel">
    ## Instan

    <Steps>
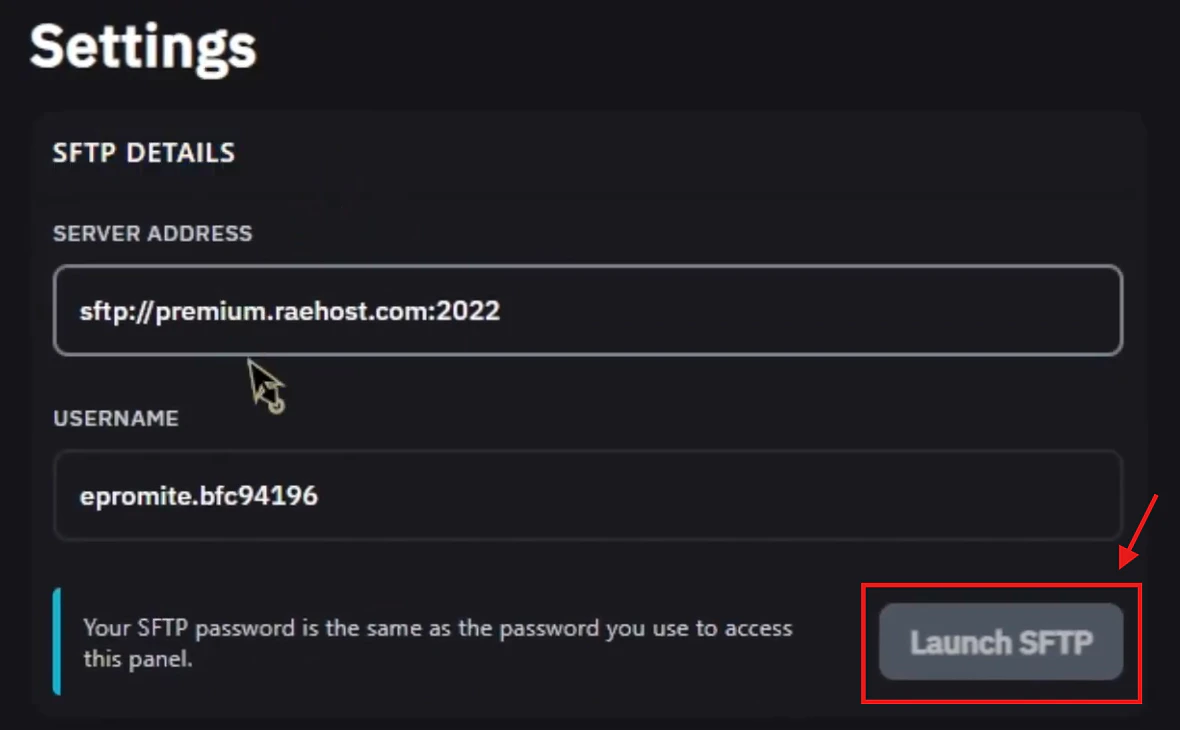
      <Step title="Masuk ke tab Settings. Kemudian klik tombol Launch SFTP pada SFTP DETAILS">
        <Frame>
          <img src="https://mintcdn.com/raehost/-cq10u10k4jAKorn/images/launch-sftp.png?fit=max&auto=format&n=-cq10u10k4jAKorn&q=85&s=1d6f9acf8098153d5718540a4faae95f" alt="Launch Sftp" width="1180" height="730" data-path="images/launch-sftp.png" />
        </Frame>
      </Step>

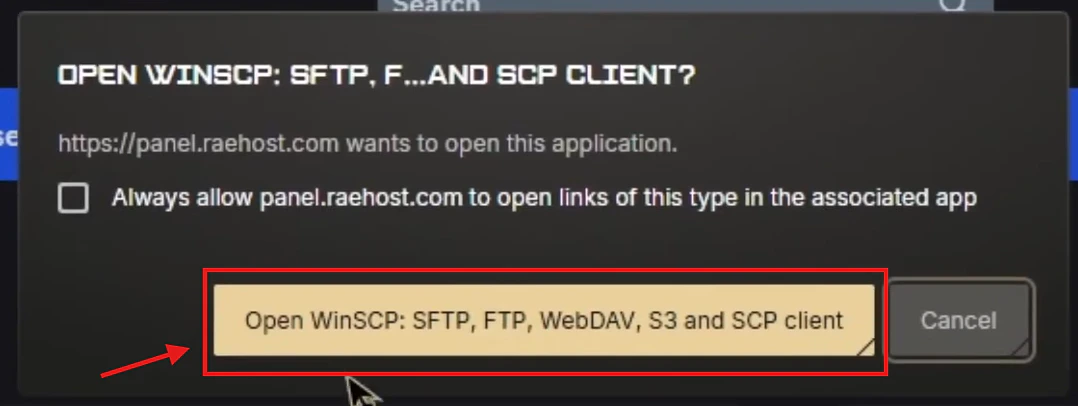
      <Step title="Akan muncul pop up. Klik Open">
        <Frame>
          <img src="https://mintcdn.com/raehost/-cq10u10k4jAKorn/images/pop-up.png?fit=max&auto=format&n=-cq10u10k4jAKorn&q=85&s=adfde4dfa12fe10c35678f856a99e9eb" alt="Pop Up" width="1078" height="406" data-path="images/pop-up.png" />
        </Frame>
      </Step>

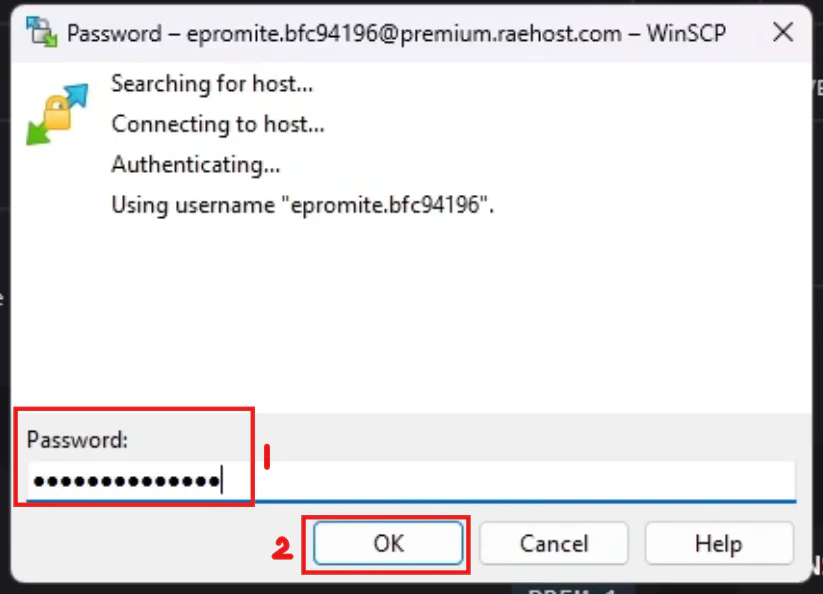
      <Step title="Isi Password">
        Masukkan password panel mu. Kemudian klik tombol OK.

        <Frame>
          <img src="https://mintcdn.com/raehost/-cq10u10k4jAKorn/images/masukin-pass.png?fit=max&auto=format&n=-cq10u10k4jAKorn&q=85&s=ce673aa18f063f44bd45beb6c072df5a" alt="Masukin Pass" width="823" height="594" data-path="images/masukin-pass.png" />
        </Frame>

        <Info>
          Jika kamu login menggunakan Google pada website, maka kamu bisa atur password disini: [https://clients.raehost.com/profile](https://clients.raehost.com/profile)
        </Info>
      </Step>
    </Steps>

    ## Manual

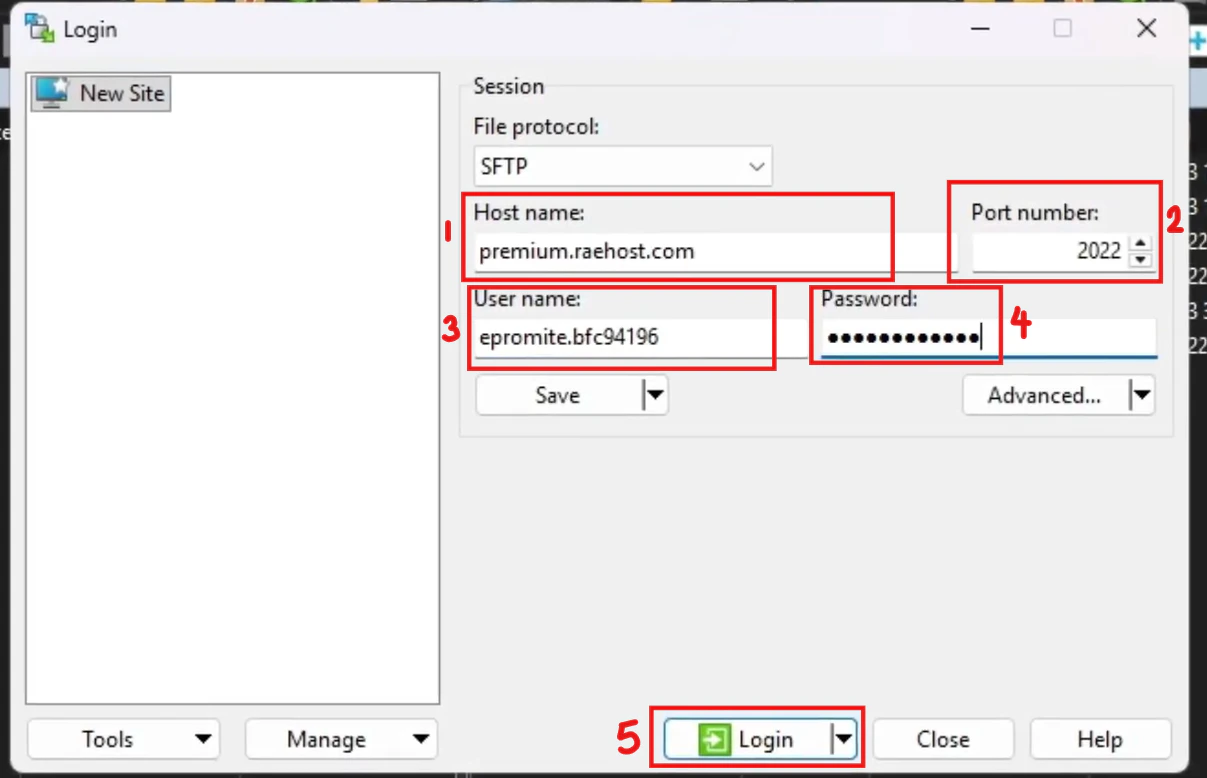
    Buka software SFTP. Isi informasi yang di dapat di `Panel > Settings` pada bagian `SFTP DETAILS`

    <Frame>
      <img src="https://mintcdn.com/raehost/-cq10u10k4jAKorn/images/connect-acc.png?fit=max&auto=format&n=-cq10u10k4jAKorn&q=85&s=2320d6e28479f6988e70983266fee240" alt="Connect Acc" width="1207" height="778" data-path="images/connect-acc.png" />
    </Frame>

    1. Isi `Host name` dengan `Server Address` pada panel. Ditulis tanpa port.
    2. Port dimasukkan pada bagian `Port Number`
    3. `Username` diisi sesuai dengan username panel
    4. `Password` yang dimasukkan juga sesuai dengan password panel

    <Info>
      Jika kamu login menggunakan Google pada website, maka kamu bisa atur password disini: [https://clients.raehost.com/profile](https://clients.raehost.com/profile)
    </Info>

    5. Klik tombol `Login`
  </Step>

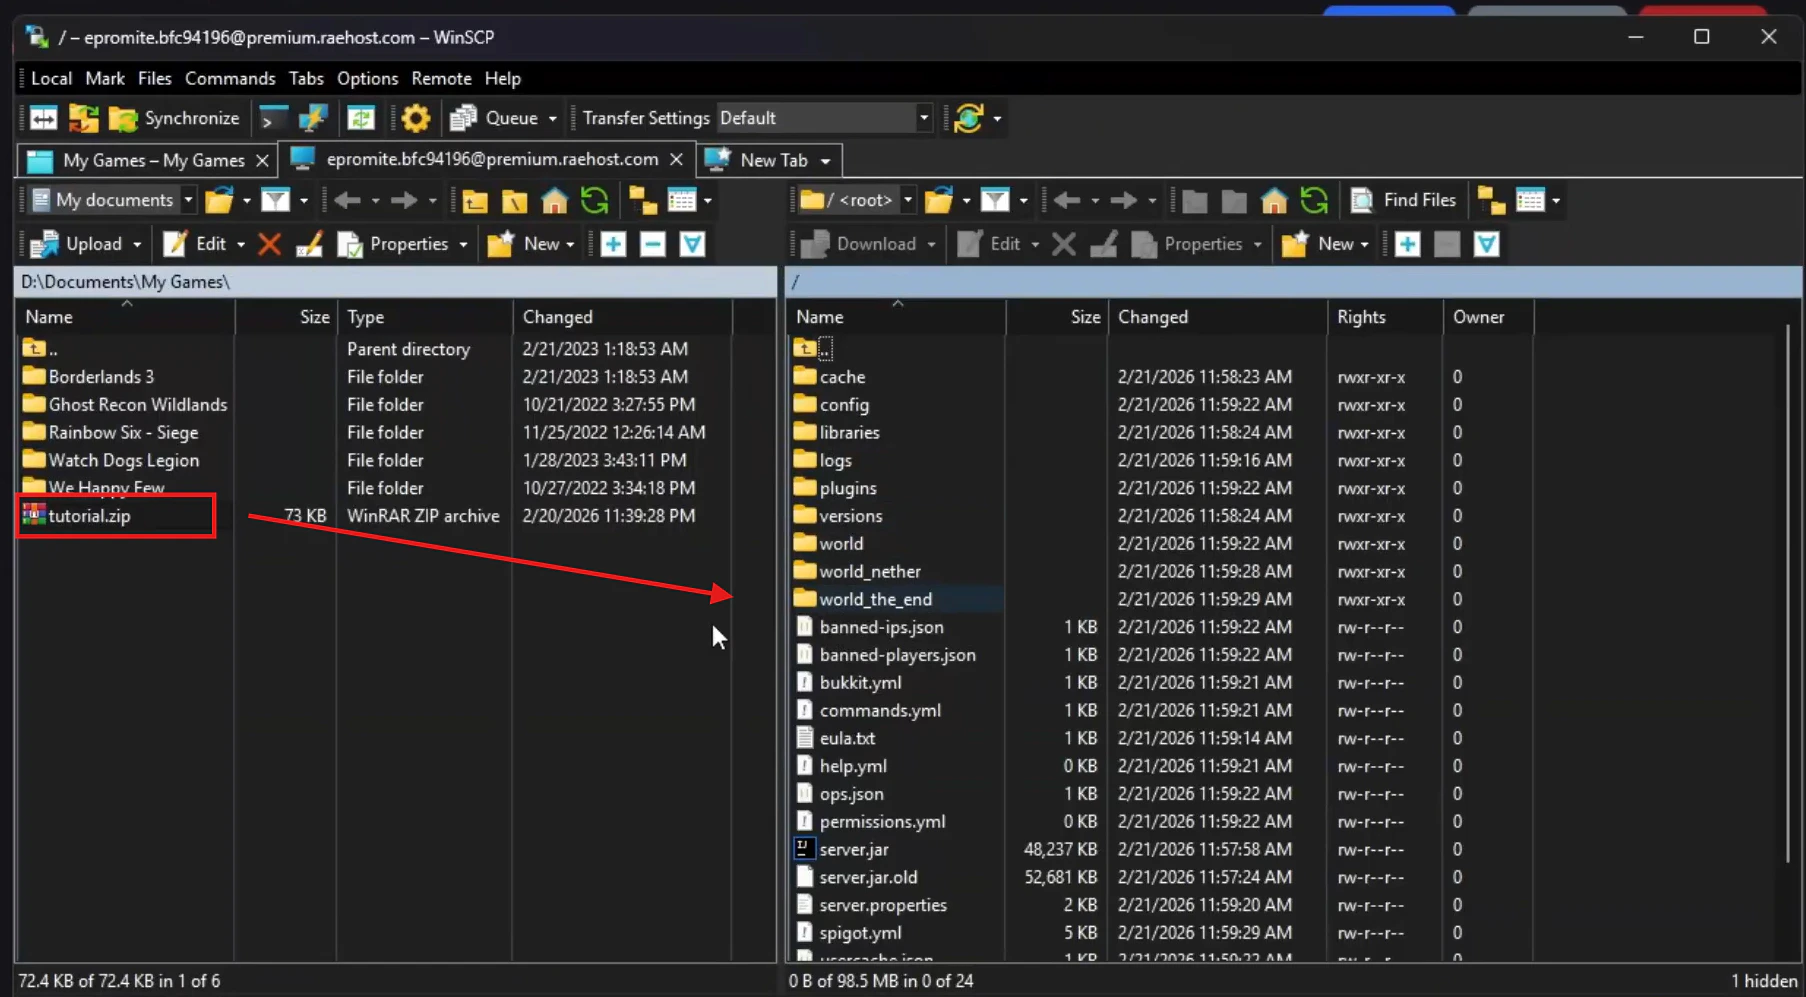
  <Step title="Drag and Drop File zip ke SFTP Server">
    <Frame>
      <img src="https://mintcdn.com/raehost/-cq10u10k4jAKorn/images/upload_file.png?fit=max&auto=format&n=-cq10u10k4jAKorn&q=85&s=13f3ca1b0c83f1a7c98bfc77bbc70c1d" alt="Upload File" width="1806" height="997" data-path="images/upload_file.png" />
    </Frame>
  </Step>

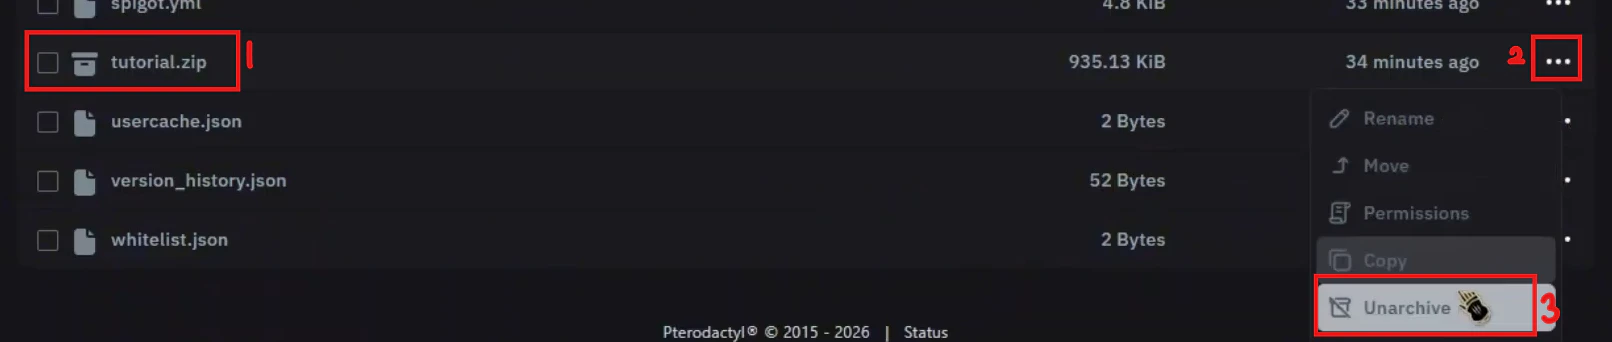
  <Step title="Buka Panel > Files">
    Cari folder yang sudah di upload, kemudian klik `Unarchive`

    <Frame>
      <img src="https://mintcdn.com/raehost/-cq10u10k4jAKorn/images/unarchive2.png?fit=max&auto=format&n=-cq10u10k4jAKorn&q=85&s=1a3880c64be6dc6e402a0eca6d93c814" alt="Unarchive2" width="1612" height="342" data-path="images/unarchive2.png" />
    </Frame>

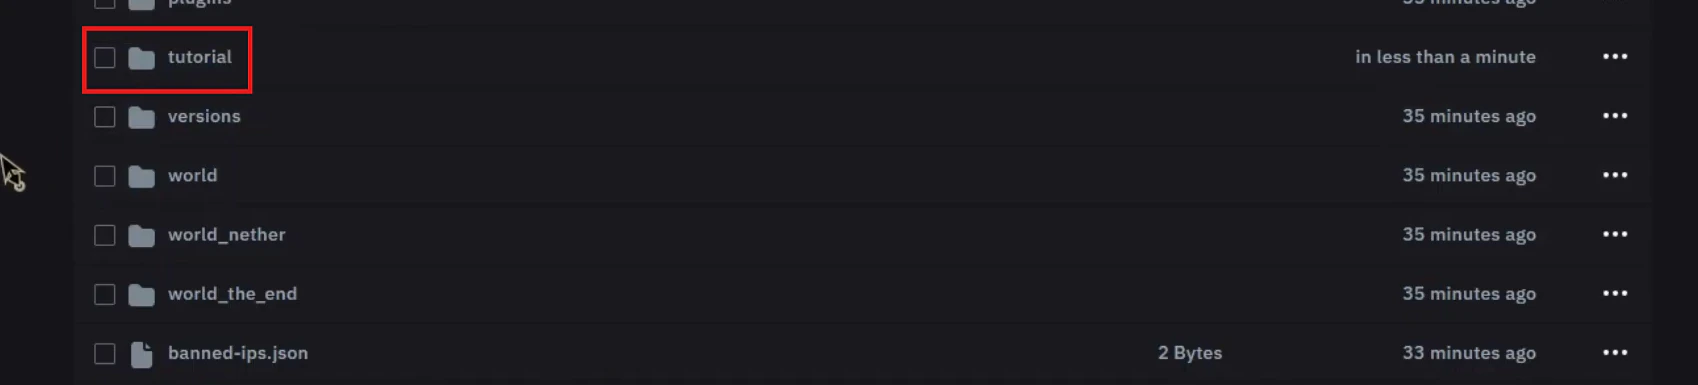
    Folder sudah terunzip

    <Frame>
      <img src="https://mintcdn.com/raehost/-cq10u10k4jAKorn/images/tutorial.png?fit=max&auto=format&n=-cq10u10k4jAKorn&q=85&s=260465cdf8f1a351cc8a432c0cd6156f" alt="Tutorial" width="1698" height="385" data-path="images/tutorial.png" />
    </Frame>

    <Info>
      Untuk Java world bisa langsung di direktori utama. Sedangkan untuk Bedrock, world harus diletakkan di folder `worlds`.
    </Info>
  </Step>

  <Step title="Set Level Name ">
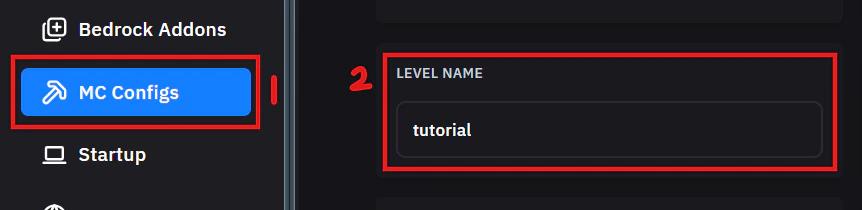
    Masuk ke tab `MC Config`, isi `LEVEL NAME` dengan nama folder yang diupload. Karena tadi folder bernama `tutorial` maka isi `tutorial`.

    <Frame>
      <img src="https://mintcdn.com/raehost/-cq10u10k4jAKorn/images/set-level-name.png?fit=max&auto=format&n=-cq10u10k4jAKorn&q=85&s=71b59ad4c7ab4027b558746c7d1b4119" alt="Set Level Name" width="862" height="210" data-path="images/set-level-name.png" />
    </Frame>
  </Step>

  <Step title="Start Server">
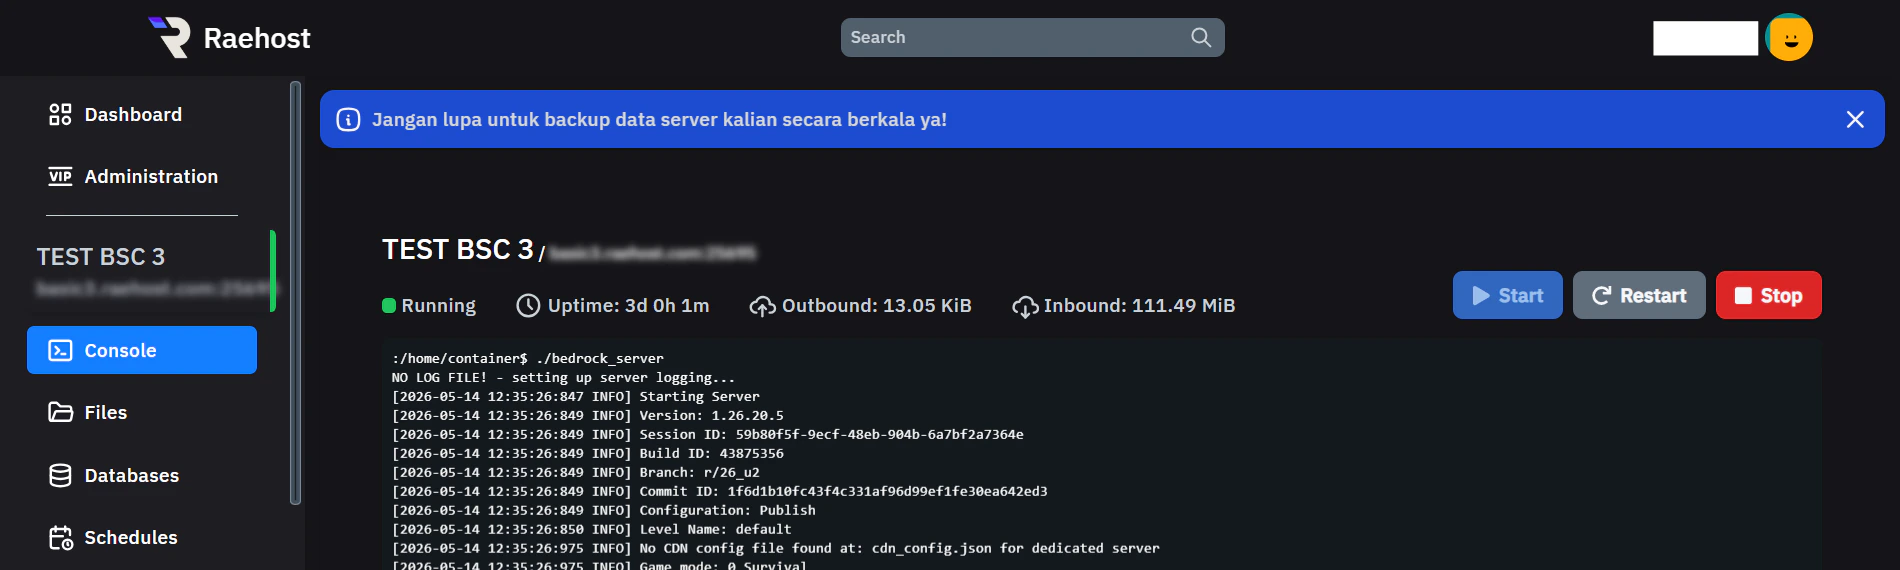
    Kembali ke tab `Console` seperti pada nomor 1. 
    <Frame>
      <img src="https://mintcdn.com/raehost/TfZvnxcVKYwm-q1G/images/image-99.png?fit=max&auto=format&n=TfZvnxcVKYwm-q1G&q=85&s=2bfb9ad4185c6672424192c4ac7ef874" alt="Image" width="1882" height="286" data-path="images/image-99.png" />
    </Frame>
  </Step>
</Steps>

<iframe src="https://www.youtube.com/embed/u3FhJgZrZwA" title="YouTube video player" frameborder="0" className="w-full aspect-video rounded-xl" allow="accelerometer; autoplay; clipboard-write; encrypted-media; gyroscope; picture-in-picture; web-share" allowfullscreen />